• About
    • All About Us
    • Contact
    • Disclosures
    • Privacy
    • Giveaway Rules
    • Sponsor
    • Features
  • Favorite Supplies
  • Gift Ideas for Kids
  • Our Books
  • By Age
    • Tweens
    • Elementary
    • Kindergarten
    • Preschool
    • Toddler
    • For Parents
    • For Teachers

Buggy and Buddy

Meaningful Activities for Learning & Creating

  • Create
    • Art Projects for Kids
    • Crafts for Kids
    • Recipes for Playing & Creating
  • Learn
    • Literacy
      • Book Sets
      • The Alphabet
      • Reading
      • Children’s Books with Activities
    • Math
    • Science
    • NGSS Science
  • Holidays
    • Fall
    • Winter
    • Spring
    • Summer
    • 4th of July
    • Chinese New Year
    • Christmas
    • Earth Day
    • Easter
    • Father’s Day
    • Halloween
    • Mother’s Day
    • New Year’s Day
    • St. Patrick’s Day
    • Thanksgiving
    • Valentine’s Day
    • School Days
    • Birthdays
    • Tooth Fairy
  • Books Activities
  • Science
  • Printables
  • SHOP
You are here: Home / Themes / Birds / How to Make Felt Bird Hair Clips for Girls

February 27, 2013 By Chelsey 35 Comments

How to Make Felt Bird Hair Clips for Girls

Pin29K
Share182
Tweet
+1

Making these DIY felt bird hair clips is super simple! Follow this step-by-step tutorial to create all kinds of cute bird hair clips- perfect to wear in spring and summer, and they make great homemade gifts too!

Be sure to follow our Buggy and Buddy Pinterest board to keep up with all the latest posts!


How to Make Felt Bird Hair Clips~ BuggyandBuddy.com

(This post contains affiliate links.)


There are so many cute hair accessories for girls, and Lucy loves putting each and every one in her hair. Some days I think she’s actually put every clip, headband and bow in her hair that she owns! Since she loves them so much, I thought it’d be fun to make some little birdie hair clips for her for spring.


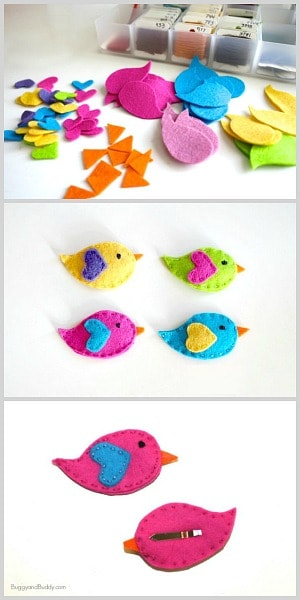
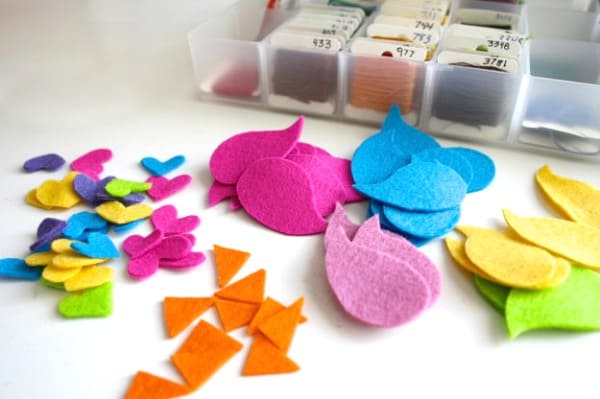
These felt bird hair clips are really easy to make. I used wool felt because I love the feel and quality of it, but you could just use regular felt from your local craft store too. (I buy my wool felt from Felt on the Fly).


How to Make Felt Bird Hair Clips~ BuggyandBuddy.com

Materials for Felt Bird Hair Clips

  • hair snap clip
  • felt
  • embroidery thread
  • embroidery needle
  • scissors


Felt Bird Hair Clip Tutorial


Directions for Felt Bird Hair Clips

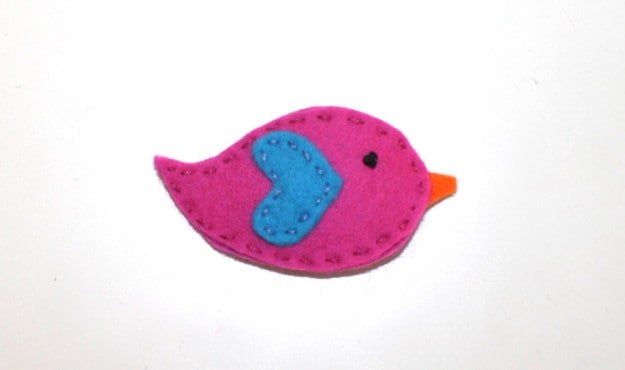
  1. Design and cut out your bird shape. You want the bird shape to be slightly bigger than your hair clip since the hair clip will actually fit inside the sewn bird. (I practiced drawing some on bird shapes paper. When I found one I liked, I cut it out and traced it onto the felt. You’ll need to trace two- one for both the top and bottom.)
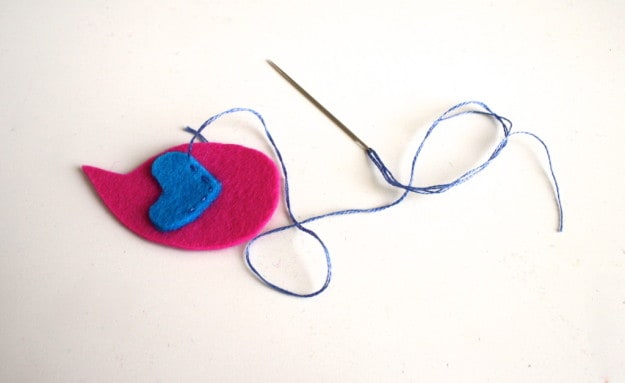
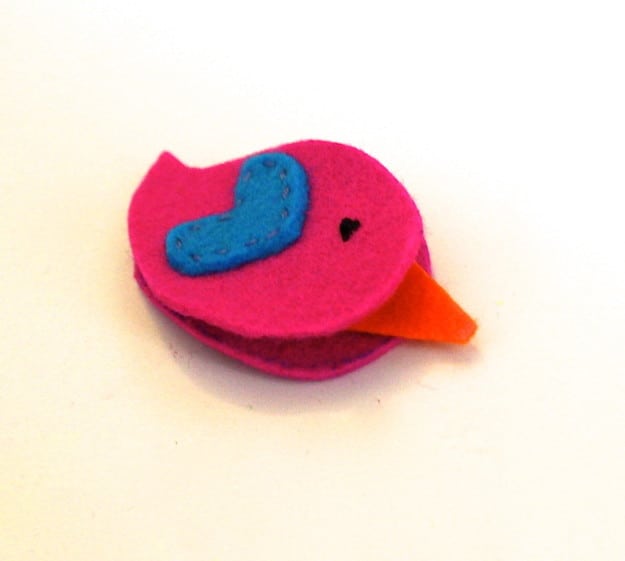
  2. Cut out a little felt heart for the wing. Sew it in place.
  3. Sew a little eye for your bird with black thread.


IMG_9686


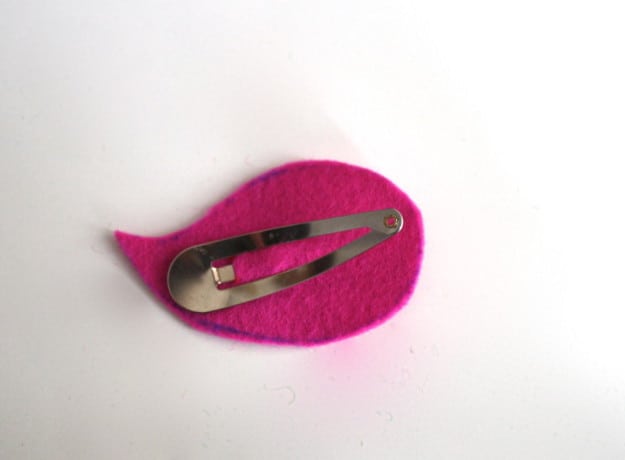
4. Prepare the bottom of the bird: Cut a little slit in the back piece of felt for the hair clip to slip through. (See photos below).

IMG_9707

front view of bottom piece of felt

IMG_9709

back view of bottom piece of felt

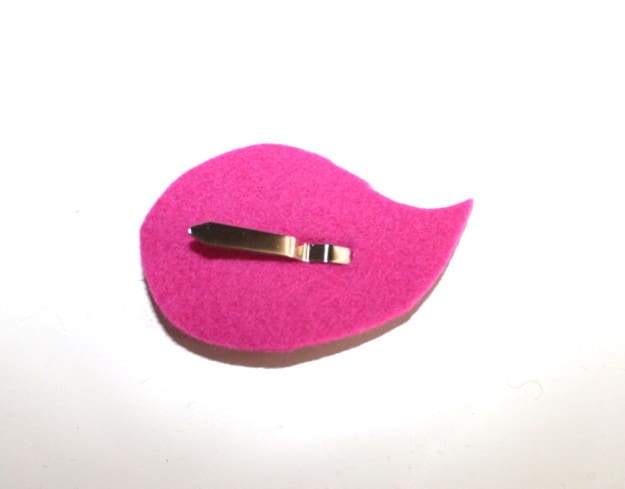
5. Create a stack of the felt pieces to be sewn. Place the bottom piece of felt (with the hair clip through the slit and snapped closed) on the bottom and the top bird piece on top. Slip a little felt beak between the two pieces on the side. (You’ll have to hold it in place as you sew.)

IMG_9710


IMG_9713


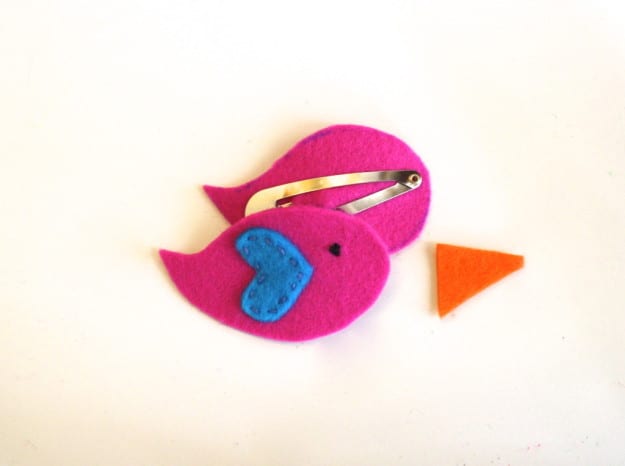
6. Sew all three pieces together. Start at the beak so you can be sure it’s secured and won’t fall out as you’re sewing the rest of your clip.

IMG_9714


IMG_9716


7. Wear them and enjoy!

Felt Bird Hair Clip Tutorial


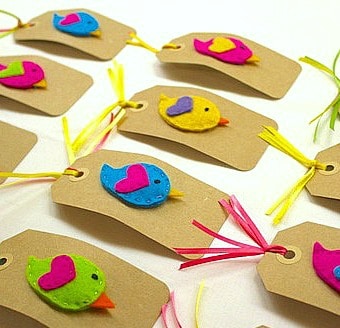
Tip: When we made these bird hair clips for favors for Lucy’s birthday party, we attached them to little gift tags (similar to these)!

Felt Bird Hair Clips as Favors for Bird-Themed Birthday Party


Related Posts

  • Stuffed Felt Alphabet Letters (Sewing Tutorial)Stuffed Felt Alphabet Letters (Sewing Tutorial)
  • DIY Felt Monarch Butterfly Wings TutorialDIY Felt Monarch Butterfly Wings Tutorial
  • Make Your Own Felt Board (Tutorial)Make Your Own Felt Board (Tutorial)
  • Felt Tooth Fairy Pillow TutorialFelt Tooth Fairy Pillow Tutorial
  • DIY Bat Costume for Kids: Bat Wings and Bat EarsDIY Bat Costume for Kids: Bat Wings and Bat Ears
  • Baby Bird Plastic Egg Shakers Craft for KidsBaby Bird Plastic Egg Shakers Craft for Kids
  • DIY Painted Bird Rock TutorialDIY Painted Bird Rock Tutorial
  • Spring Crafts for Kids: Nest and Baby Bird CraftSpring Crafts for Kids: Nest and Baby Bird Craft
Pin29K
Share182
Tweet
+1

Filed Under: Birds, For Parents, Spring, Tutorials Tagged With: birds, felt, tutorials

« Our 1st Trip to Disneyland
Making Bird Birthday Invitations »

Comments

  1. Melissa Lennig says

    February 27, 2013 at 4:25 pm

    Chelsey – Those are ADORABLE! Makes me wish for a girl. I have a new niece coming in July! Can’t wait to make some for her! Thanks for the directions!

    Reply
    • Chelsey says

      February 27, 2013 at 8:01 pm

      Thanks, Melissa! They really were so easy to do~ was even able to work on them while interacting with the kids at the same time. (That says a lot~ you know how loud and active kids can be!) Loving your blog btw!

      Reply
  2. sheila says

    February 27, 2013 at 5:07 pm

    Found this through WW. Those are adorable. Might have to make some for my nieces.
    Thanks for sharing.
    Sheila

    Reply
    • Chelsey says

      February 27, 2013 at 8:00 pm

      Thanks, Sheila! They were so easy!

      Reply
  3. Diana Rambles says

    February 28, 2013 at 7:09 am

    SUPER CUTE! I would love you to come join my Pin Me Linky Party that starts Friday morning at 8am CST. I allow up to 3 links each week!

    Reply
  4. Sue {munchkin munchies} says

    February 28, 2013 at 7:36 pm

    These are darling, and I LOVE the colors!

    Reply
  5. Julie says

    March 1, 2013 at 11:33 am

    Those are darling. My two girls will enjoy making them. – Thanks Julie

    Reply
  6. Kelly says

    March 1, 2013 at 5:27 pm

    Very cute – thanks for sharing!

    Reply
  7. Ana says

    March 2, 2013 at 6:17 am

    So cute! I love the colors too!

    Reply
  8. Jessica @ Play Trains! says

    March 3, 2013 at 1:04 am

    Those birds are so cute! My son would probably have fun playing with them as “Happy Birds” (Angry Birds who have gotten their eggs back and taught the pigs to share!).

    Reply
    • Chelsey says

      March 4, 2013 at 9:20 pm

      I love the happy birds idea! So cute! 🙂

      Reply
  9. Heather {Upside Down Homeschooling} says

    March 3, 2013 at 4:40 pm

    Adorable!!!

    Thanks so much for linking up to the Hearts for Home Blog Hop! Blessings!!

    Reply
  10. Jessica Mitchell-Stoddard says

    March 3, 2013 at 6:08 pm

    What a fabulous project! This would make great Easter gifts for the girls and nanny as well as my 4-year-old niece! Thank you so much for sharing!

    Reply
  11. Laurie @ Simply Creating Home says

    March 3, 2013 at 9:41 pm

    How sweet! With their bright and fun colors, they are so cute for spring!

    Reply
    • Chelsey says

      March 4, 2013 at 9:18 pm

      I love seeing them all together~ wonder how many I could fit in Lucy’s hair at once? 😉

      Reply
  12. Laura says

    March 4, 2013 at 5:30 am

    These are so sweet!
    🙂

    Reply
  13. Ginger says

    March 5, 2013 at 5:35 am

    You have been featured on Gingerly Made! Thanks for linking up.
    http://www.gingerlymade.com/2013/03/show-tell-features.html

    Reply
  14. Annette says

    March 5, 2013 at 10:32 pm

    I can’t wait to make some of these for Molly– maybe for Easter?

    Thank you for visiting Waldorf Wednesday. Hope to see you back this week!
    http://ourseasonsofjoy.com/waldorf-wednesday-link-up/waldorf-wednesday-25/

    Reply
  15. Natalie says

    March 6, 2013 at 7:59 am

    ADORABLE!!!
    Pity my girls are all grown up!
    Thanks for sharing this on Tutorial Thursdays 🙂
    Your post is my pick of the week and I will be featuring it tomorrow on my blog, and your image will also be pinned and added to my Facebook Page Album of the same name.
    Please do come by to grab your button.
    I would love it it you would visit again this week 🙂
    x
    Natalie
    http://www.marigoldsloft.blogspot.com

    Reply
    • Chelsey says

      March 7, 2013 at 9:56 pm

      Thank you so much, Natalie! So thrilled to be featured!!

      Reply
  16. Rachel says

    March 6, 2013 at 7:36 pm

    My gosh, these are PRECIOUS!!!! Just LOVE the things you are doing over here at Buggy & Buddy! So many fun ideas! Thanks for sharing again over at Sun Scholars. I am featuring you AGAIN over at this week’s For the Kids Friday link party. Yippee!!! Thanks for such a cute project!!

    Reply
    • Chelsey says

      March 7, 2013 at 9:54 pm

      Thank you so much, Rachel! So excited to be featured!!

      Reply
  17. Carrie says

    March 8, 2013 at 4:17 pm

    What a wonderful tutorial!! I am definitely going to be making some of these. Thank you for sharing at Sharing Saturday!!

    Reply
  18. Randi - Dukes and Duchesses says

    March 12, 2013 at 5:47 am

    Those are just precious! I’m thinking that my girls could even try stitching those as a fun project … I pinned it! Thanks so much for linking up at Project Inspire{d}!

    Reply
  19. annie @ montanasolarcreations says

    March 22, 2013 at 7:00 pm

    I just pinned this so I can make some! My daughter is only 18 months old and her hair is too baby fine to keep a clip in but when she gets a little bigger these will be so much fun to make!

    Reply
    • Chelsey says

      March 24, 2013 at 7:41 pm

      They would be so cute in little girl hair! Thank you for pinning!

      Reply
  20. Jennifer@heylittlemother.com says

    July 21, 2013 at 3:58 am

    These hairclips are adorable! Thanks for showing me how to secure the clips inside the birds- that’s exactly what I needed to know! I better get to work before my littlest starts pre-k in September 🙂

    Reply
  21. Jen says

    January 17, 2014 at 8:35 am

    Adorable! Can you tell me how you finish the running stitch off? Do you knot it in the back?

    Reply
    • Chelsey says

      January 17, 2014 at 9:09 am

      Thanks, Jen! Yes, I just cut off the thread and knotted it. Hope that helps! Have fun! 🙂

      Reply

Trackbacks

  1. Finished Friday #77 - All Our Days says:
    March 8, 2013 at 1:25 am

    […] Chelsey showed us how to make these adorable felt birdie hair clips. I love making pretty hair clips so as soon as I get a little crafting time, these birdies are […]

    Reply
  2. 9 Fun and Creative Bird Crafts for Spring | Buggy and Buddy says:
    March 24, 2013 at 6:39 pm

    […] Wool Felt Bird Clip Tutorial by Buggy and Buddy […]

    Reply
  3. Bird Themed Birthday Party | Buggy and Buddy says:
    April 7, 2013 at 6:32 pm

    […] also made some little birdie clips to put in the favor bags. Here’s the tutorial for the hair […]

    Reply
  4. Crafts for Kids Blog » Tutorial : Wool Felt Birdie Hair Clip says:
    April 19, 2013 at 4:44 pm

    […] Follow this Link to the Tutorial […]

    Reply
  5. DIY Applique Shirt for St. Patrick's Day says:
    February 6, 2015 at 5:51 pm

    […] Felt Bird Hair Clips […]

    Reply
  6. Project Run and Play Week 1 says:
    June 21, 2016 at 12:04 am

    […] The adorable birdie hair clip was made (by felting) for her by my 7 year old niece (with some help from my mom too)! To make this clip, my niece and my mom used this awesome tutorial […]

    Reply

Leave a Reply Cancel reply

Your email address will not be published.

This site uses Akismet to reduce spam. Learn how your comment data is processed.

  • Facebook
  • Instagram
  • Pinterest
  • Twitter

New? Start here…

Welcome to Buggy and Buddy! I'm Chelsey, a former teacher and parent living on the central coast of California. I love sharing crafts, science, STEM and STEAM activities, free printables and more! Read More…

Popular This Week

  • STEM for Kids: Straw Rockets (with Free Rocket Template) STEM for Kids: Straw Rockets (with Free Rocket Template)
  • Science for Kids: How to Make a Kaleidoscope Science for Kids: How to Make a Kaleidoscope
  • Chemical Reactions: Make a Penny Turn Green (with free printable) Chemical Reactions: Make a Penny Turn Green (with free printable)
  • STEM for Kids: Egg Drop Project STEM for Kids: Egg Drop Project
Christmas Faux Stained Glass Art Project for Kids

Christmas Stained Glass Art Project for Kids

Exploring color mixing with preschoolers

Mixing Colors: Create and Name Your Own Colors

Colorful Painted Paper Butterfly Craft with free template using black glue and watercolors- looks like faux stained glass!

Colorful Painted Paper Butterfly Craft for Kids

Father's Day Tie Craft for Kids Using Black Glue and Watercolor and free template

Father’s Day Craft for Kids: Black Glue and Watercolor Tie

Collage Art Project for Kids using bleeding tissue paper- perfect process art for mother's day

Collage Art Project for Kids Using Bleeding Tissue Paper

Protected by Copyscape

Copyright © 2019 Buggy and Buddy. All rights reserved. You may not take images or content from this site without written permission.