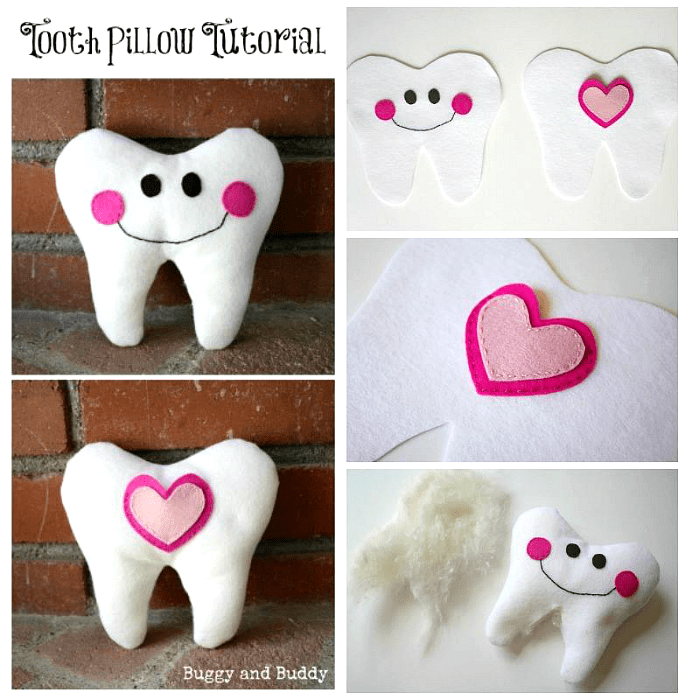
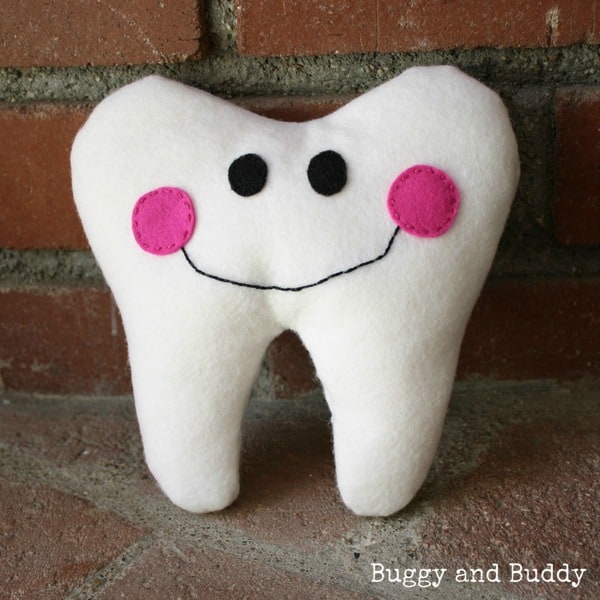
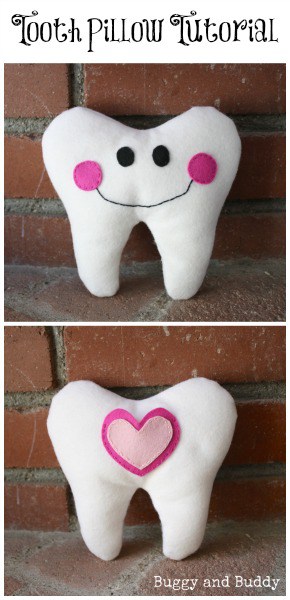
Making your own tooth fairy pillow is a great beginning sewing project. We used felt to make this simple, tooth-shaped tooth fairy pillow complete with a little pocket in the back!
Does your child have a tooth fairy pillow at home? I don’t ever remember having a tooth fairy pillow when I was younger. I think I just stuck my little tooth directly under my bed pillow for the tooth fairy.
Out shopping quite a few months ago, I ran across an adorable tooth fairy pillow shaped just like a tooth. I thought it was such a cute idea to have a pillow with a little pocket to hold your tooth while waiting for the tooth fairy. I made sure to remember to make one for Lucy when it was time.
Well, I think now is the time! Lucy doesn’t have any loose teeth yet, but ever since she turned 5, she pushes on each and every tooth endlessly checking for that first wiggle. I figured while I have a small window of time before that first tooth does start wiggling, I’d better get going on making Lucy her tooth fairy pillow. (This post contains some affiliate links.)
Felt Tooth Fairy Pillow Tutorial
Materials for Tooth Fairy Pillow
- 2 large pieces of white felt (I used 8 inch x 12 inch.)
- Some smaller pieces of felt in various colors. (For the eyes, cheeks, heart pocket)
- Sewing or embroidery needle
- Thread or embroidery thread
- Sewing machine (optional)
- Pins
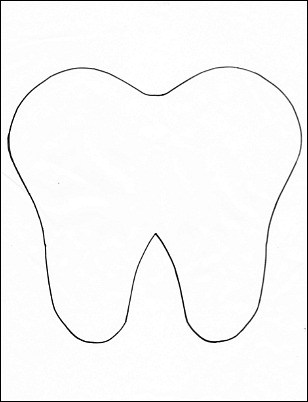
- Paper and pencil to draw your tooth outline (or print out this free tooth pattern)
- Scissors that can cut through felt (I used Fiskars Dressmaker Shears)
How to Make the Tooth Fairy Pillow
1. The first thing you will need to do is cut out all your felt pieces.
- To make the main part of the pillow, Draw a tooth shape on a sheet of paper or print out this free tooth pattern that I drew to make mine. Cut it out and pin it to one piece of white felt. Then use the paper tooth shape to guide your scissors as you cut through the white felt. Do this twice so you end up with two pieces (for both the front and back).
- Cut out two hearts (one a bit smaller than the other) to make the tooth pocket.
- Cut out two black ovals for eyes and two pink circles for cheeks.
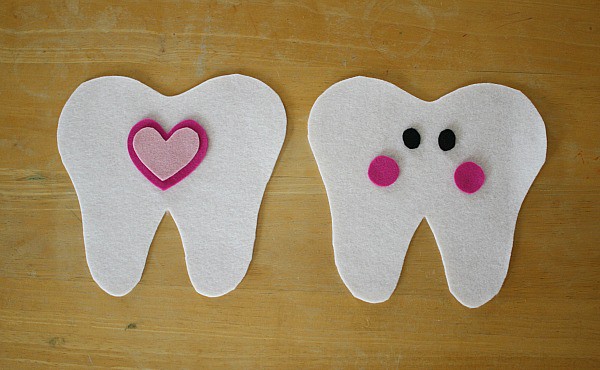
2. We’re going to first make the double heart pocket. Sew your little heart onto your big heart. (I did this by hand with some embroidery thread and a needle.) Sew completely around the heart so it is fully attached.

3. Now it’s time to attach the heart pocket to what will be the back of the tooth fairy pillow. Sew your double heart onto one white tooth-shaped piece of felt. Be sure NOT to sew the top portion of the double heart so it will become the opening to the heart pocket for your child’s tooth.

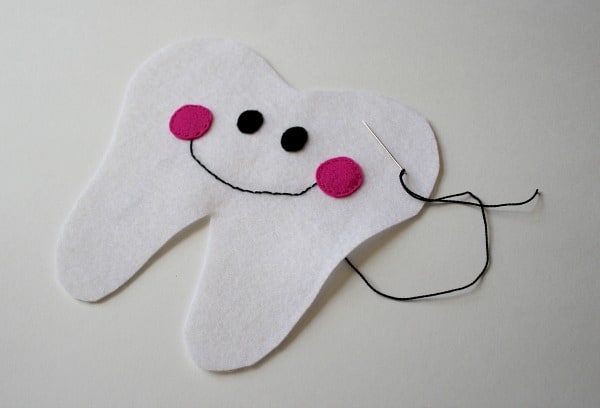
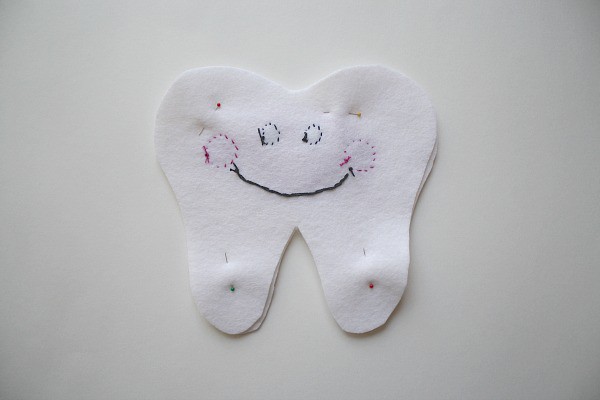
4. Set aside the back portion of the pillow and grab your other white tooth shaped piece of felt. Decide where you want the black eyes to be and pin them into place. Sew them on by hand. Do the same with the pink cheeks.

5. Lightly draw where you want the mouth to be and sew over it with embroidery thread. I used a simple back stitch.
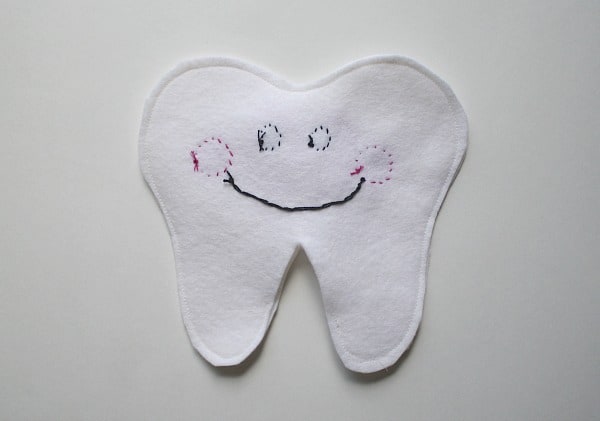
6. You should now have a front piece with two eyes, two little cheeks and a sewn mouth, and a back piece with a heart pocket.

7. Now it’s time to make the actual pillow. Place your two white pieces of felt together front-to-front (so the unattractive backs are showing on both sides). Pin them in place.
8. Sew around the edge leaving a hole in the bottom (so you can turn it right-side out and stuff it later). You can do this either by hand or with a sewing machine. Once you’ve finished, cut off any remaining thread.
9. Turn the pillow right-side out and stuff the pillow with whatever type of fiberfill your prefer. (I used something similar to this.)

10. Once you’re satisfied with the stuffing, it’s time to sew the hole in the bottom of the pillow shut. You can do this any way you’d like, but I used this tutorial to sew an invisible seam by hand. Cut off your leftover thread and you are finished!
Now that I’ve finally made the first tooth fairy pillow in our home, it’s time to start deciding on tooth fairy traditions for our family. Lucy has already asked me if I think the tooth fairy would mind if she studies her first lost tooth for a while before she puts it under her pillow. (Looks like we’ll be getting the microscope out in the future!) The next step is to discover how much the tooth fairy pays per tooth.