Use our free template and some common craft materials to make some cute winter birds that can stand alone and rock back and forth. Be sure to check out tips for modifying this craft for various ages, as well as ways to extend this activity, at the end of this post.

Related Children’s Books
- Snow Birds by Kirsten Hall
- The Winter Bird by Kate Banks
- No Two Alike by Keith Baker
- Owl Moon by Jane Yolen
Materials for Winter Bird Craft
- White or colored cardstock
- Scissors
- Liquid Glue, glue stick and/or glue dots
- Googly eyes or eye stickers
- Tissue Paper (optional)
- Free Winter Bird Template PDF (below)
Directions for Creating Winter Bird Craft
- Print out the free winter bird template PDF. You can print it out onto white cardstock if your bird will be white or if you plan on making a colorful bird by coloring the white cardstock. You can also print the template out on colored cardstock matching the color of the bird you choose to make.
- Cut out the large circle (body of the bird) and the two small circles (the head of the bird). Save the remaining cardstock for later.
- Optional: Cut up some small pieces of tissue paper. We chose white and light blue to give the bird a wintery feel. Place your three circles onto a piece of paper or other surface you won’t mind glue getting onto. Spread a small layer of liquid glue onto the large circle. Add the small pieces of tissue paper onto the glue. Set it aside to dry. You can also add some small pieces of tissue paper to the bird’s head like we did. Follow the same procedure in step 5. Let the glue dry completely and set aside.
- Prepare the rest of the cardstock parts for your bird. You’ll need a beak. You can use the one on the template or cut your own. Use the leftover cardstock from your circles to cut out a tail and two wings. (Some children prefer to cut them out freestyle, while other children prefer drawing the shapes and cutting them out.)
- Once the glue is dry, fold the large circle in half to form the bird’s body. It can now stand alone and rock. Glue the two smaller circles onto each side of the body to form the head. Glue the beak between the two circles (or just on top of one of the circles).
- Add a googly eye to each side of your bird.
- Take your cardstock tail (from step 8) and glue it on your bird’s body. We folded ours in half and glued it on the very top so it folded over onto each side. Some children might prefer just gluing the tail onto one side of the bird. Cut some small slits into the end of the tail to give it a feather-like appearance.
- Glue a wing onto a each side of your bird.
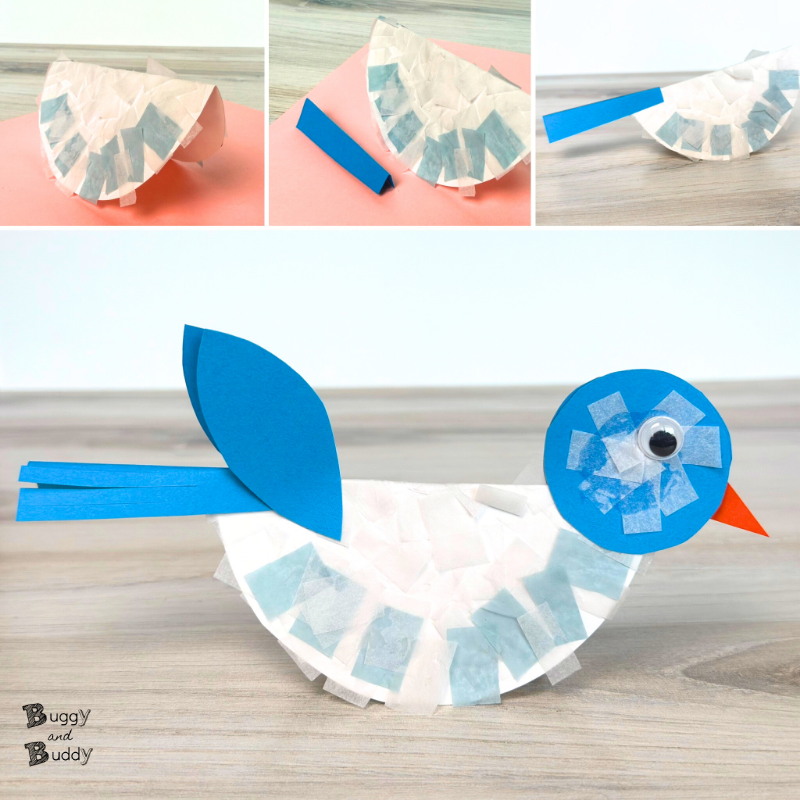
Let your bird completely dry and it’s done. It can rock back and forth!

Tips and Modifications to Winter Bird Craft
- Make the bird flat by only using half of the circle for the body. You can glue it onto a sheet of art paper and add scenery to the background.
- Use feathers in place of torn tissue paper.
- Younger children might find it easier to use cut up squares of construction paper rather than tissue paper.
- Have children research winter birds and use this template to create a specific bird they’ve studied.
- Make a bird feeder as a way to extend the activiity.